Recent Posts

Showing posts with label Dessert. Show all posts

MINT BROWNIES

by


Easy-to-make mint brownies with a thick layer of mint frosting and a soft chocolate ganache topping.

Mint brownies

  • When I was in my junior year of college at BYU, I worked for a bit at one of the Creamery’s in Provo. I’d work early in the morning, go to classes and do homework, and then wait tables at night. If you are from Utah and live near the Provo area you likely know about the BYU Creameries. They are pretty “famous” in and near Provo for their ice cream (Their Graham canyon ice cream contains all good things in life). They’re also known for their donuts and mint brownies.
  • If you happened to be the first person at work when the orders came in, you got the oh-so-coveted responsibility of cutting up the mint brownies. This was the best responsibility because the small little corners or edge pieces that weren’t so pretty? They were fair game. Meaning, we were allowed to eat all ugly pieces. Naturally, I was always early to work. And I cut up and subsequently ate those edge pieces far, far too often! 
  • So, I feel that this experience has definitely made me an expert with all things mint brownies. And by expert, I mean, I don’t settle for second rate mint brownies. This recipe has been several months in the making. I’ve tried lots of different ingredients/quantities/methods and am so excited to finally share with you my very favorite mint brownies. 


Mint brownie tips

  • For easier bar removal, line the pan with parchment paper.
  • Make sure the cream cheese and butter are softened to room temperature before beating; otherwise the frosting can get a bit lumpy and not mix smoothly.
  • If your brownie mix comes with a fudge layer: leave it out of the mix and spread it onto the brownies straight from the oven instead; this gives you another delicious layer!
  • Chop Oreos finely: we don’t want chunks of Oreos in the brownies, but rather for the small pieces to melt and further intensify the chocolate flavors in the brownies.
  • Be patient in layering: the brownies need to be completely cooled and firm before adding the frosting and the frosting needs to be chilled before adding the chocolate ganache. Take your time layering this dessert for best results. I usually make the brownie base the night before!
  • For easier slici


Ingredients

  • 1 package (17.8 ounces) brownie mix AND ingredients called for on the back (I recommend Betty Crocker's Supreme Triple Chunk)
  • 6 regular Oreos, finely chopped (leave the creme filling inside)

Frosting

  • 3 ounces (88g) full-fat cream cheese
  • 4 tablespoons (56g) unsalted butter
  • 1 teaspoon peppermint (not mint) extract
  • 1/16 teaspoon fine sea salt
  • 2 cups (225g) powdered sugar
  • Optional: green food coloring

Ganache

  • 1 cup + 2 tablespoons (200g) milk chocolate chips (or semi-sweet chocolate chips if desired)
  • 2/3 cup (160g) full fat heavy cream
  • 1 tablespoon (14.2g) unsalted butter


Instructions

  1. BROWNIES: Preheat the oven to 350 degrees F. Line a 9x9 inch (8x8 inch works, but we prefer 9x9) baking pan with parchment paper leaving an overhang. Follow package directions to prepare the brownies -- do NOT add a fudge packet if it came with your brownies (reserve the packet for later). Very finely chop up 6 Oreos and add to the brownie ingredients. Stir everything together to get a thick brownie batter. Transfer to the prepared pan and bake according to package instructions. Don't over-bake. As soon as brownies are baked, remove from the oven and allow to cool for 3-4 minutes. Now IF you had a fudge packet, spread it over the brownies here. Cover the brownies tightly and place in the fridge (or freezer) while preparing the frosting layer.
  2. FROSTING: In a large bowl, beat together the (softened to room temperature; not melted) cream cheese and butter until smooth and creamy. Add in the peppermint extract (to preference; we use 1 teaspoon (See Note 1). Add in the salt, food coloring if using, and powdered sugar. Beat until smooth and creamy. Resist the urge to add milk or cream, it will seem like it’s not coming together at first but just keep beating until it does. Scrape down the sides as needed with a spatula. Spread frosting evenly over completely cooled brownies. Return the brownies to the fridge while preparing the ganache.
  3. GANACHE: measure chocolate chips out in a heatproof bowl. Add heavy cream and butter to a glass measuring cup and microwave until steaming hot (but not boiling), about 1 to 1 and 1/2 minutes. Pour the hot cream mixture over the chocolate chips. Do not stir. Cover the bowl with the chocolate chips with a pot lid or whatever you have to keep in the heat. Let stand for 5 minutes. Then stir until chocolate is fully melted and smooth. If needed, microwave the mixture for 15 seconds to further melt. Let ganache stand for 10-15 minutes to thicken. Whisk again and then pour and smooth over the frosting layer. Let brownies stand at room temperature for 30 minutes (to keep the top glossy, don't immediately refrigerate) and then refrigerate for 2-3 hours or until chocolate topping is firm. 
  4. SERVE: using the overhang of parchment, remove brownies from the pan and cut with a very sharp knife. To get clean cuts, run your knife under very hot water, dry, and then slice in quick fast cuts.


Recipe Notes

  • Note 1: the strength of the extract varies from brand to brand; I use McCormick peppermint extract and 1 teaspoon is perfect for us. Taste the frosting and decide if you'd like more extract up to 1 and 1/2 teaspoons.

Funfetti Bars

by


Gooey, sweet, and loaded funfetti bars. A chocolate chip cookie base with a delicious candy packed top — marshmallows, chocolate-covered pretzels, miniature M&Ms, and sprinkles!


How to make Funfetti Bars
  • The photo collage above and below this text show the general process of making these funfetti bars.
  • Make the cookie base: take your time to really cream the butter and sugars — this will create a great foundation for the cookie bars.
  • Top baked bars with marshmallows and bake again.
  • Meanwhile, chop up chocolate covered pretzels (Flipz).
  • Add chocolate covered pretzels, miniature M&Ms, and sprinkles (I totally left these out in pictures, but we always have them on the bars!) to the bars.
  • Let cool and then cut into bars.
  • Variation ideas
  • Pretty much any chocolate candy works on top of these funfetti bars! If you have some leftover candy, chop it into small pieces and add it on top.
  • The chocolate covered pretzels and miniature M&Ms can be substituted with equal amounts of any other chopped candy. Some ideas: chocolate covered almonds, chopped up candy bar (Snickers, Hershey’s bar, etc), white chocolate covered pretzels, peanut butter M&Ms etc.
  • Make these bars festive by using holiday (or event) colored M&Ms and sprinkles. I shared these Spring Confetti Bars a few years ago and they’ve been a huge hit on this site!

Ingredients
Cookie Bars
  • 6 tablespoons (85g) unsalted butter room temperature
  • 1/2 cup (110g) brown sugar, lightly packed
  • 1/4 cup (55g) white sugar
  • 1 large egg
  • 1 teaspoon pure vanilla extract
  • 1/4 teaspoon baking soda
  • 1/4 teaspoon fine sea salt
  • 1 cup + 2 tablespoons (142g) white flour
  • 1 cup (165g) milk chocolate chips (can also use semi-sweet chocolate chips)
Toppings
  • 1 and 1/2 cups (60g) white miniature marshmallows
  • 1/4 cup (50g) miniature M&Ms Note 1
  • 3/4 cup (66g) chocolate-covered pretzels, coarsely chopped
  • 2 tablespoons sprinkles

Instructions
  1. PREP: Preheat the oven to 325 degrees F. Line an 8 x 8 pan with parchment paper (do not skip, these bars are sticky!) and set aside.
  2. COOKIE BASE: In a large bowl, using hand mixers, cream the room temperature butter (do not melt at all) with the brown sugar and white sugar. Beat in the egg and vanilla extract. Then add the baking soda, salt, flour, and chocolate chips. Beat until the dough is combined and smooth. It is a bit wet.
  3. BAKE: Press the dough evenly into the bottom of the prepared pan and bake for 19-23 minutes or until lightly golden brown at the edges and firm in the center (shouldn't be glossy)
  4. MARSHMALLOWS: Remove from the oven and top with the marshmallows. Bake for 1 and 1/2 more minutes and remove.
  5. CANDY: Top with the miniature M&M's, coarsely chopped chocolate pretzels, and sprinkles.
  6. COOL: Let funfetti bars cool at room temperature for at least an hour, then cut into bars (with a hot sharp knife -- run under hot water, dry, cut, repeat), and enjoy! Best enjoyed within the same day these are made because of the marshmallows on top.
  7. STORAGE: If you have some leftover, you can keep these bars, tightly covered, at room temperature for up to 3 days. They can also be stored in an airtight container in the fridge for up to a week, but the marshmallow does lose flavor and texture.

Recipe Notes
  • Note 1: Miniature M&Ms can be found on the baking aisle of most grocery stores; they're labeled as M&M milk chocolate baking bits.

PUMPKIN CHOCOLATE CHIP COOKIES

by
The best ever pumpkin chocolate chip cookies! These cookies are soft and chewy with crisp edges instead of typical cake-like pumpkin cookies.


How to make pumpkin chocolate chip cookies

  • Melt the butter: melting the butter is going to give these cookies that soft & chewy texture
  • Add sugars to the cooled butter: once the butter is melted, it needs to cool back down to room temperature otherwise the butter will melt the sugars and make these cookies greasy and flat
  • Stir the sugars into the butter until smooth
  • Add the pumpkin, vanilla extract, and the egg yolk of an egg. Save the whites for a different recipe like this egg wrap
  • Mix until smooth
  • Add in all the spices, salt, and baking soda: spices can be added to preference, how the recipe is written is exactly how we like these cookies. You could also replace all the spices (except the cinnamon) with 1 to 1 and 1/2 teaspoons of pumpkin pie spice
  • Stir until everything is well incorporated: we don’t want a pocket of spice ending up in one cookie!
  • Add in flour and chocolate chips: we love milk chocolate chips in this recipe, but semi-sweet or dark chocolate would also be delicious — use whatever is your favorite
  • Mix until you’ve got a thick (sticky) cohesive dough. Cover tightly and chill the dough for one hour.
  • Roll cookie dough balls that are taller rather than wider. Cookie dough balls should be 1 and 1/2 tablespoons of dough or about 30 grams if you’ve got a food scale handy.


Pumpkin chocolate chip cookies troubleshooting

  • Why are my pumpkin chocolate chip cookies hard?
  • Most likely because the cookies were baked too long or at too high a temperature. Make sure your oven is correctly calibrated and watch the cookies closely near the end of bake time.
  • You cookies could also be hard if you over-measured the flour or if other ingredients weren’t fresh. Ensure your baking soda is fresh and your brown sugar isn’t too hard.
  • Why are my pumpkin chocolate chip cookies flat?
  • Most likely because the cookies did not chill long enough. Since there is melted butter in the batter, it needs a chance to firm up again. Also, if the butter was too hot when you added in other ingredients, they’ll likely end up a bit flat and greasy.
  • These pumpkin chocolate chip cookies will also be flat if the flour was under-measured. One other factor that comes into play is if you live in a high altitude area. 


How do you keep cookies soft after baking?

  • After baking the cookies, let them cool completely on a wire rack (this will keep the bottoms from getting soggy from the steam). Once cooled, place cookies in an airtight container and store at room temperature. For tips on how to “revive” cookies, check out these tips from Cooks Illustrated. Note that these cookies are best eaten within 3 days; after that they begin to lose texture and flavor.


Ingredients

  • 1/2 cup (111g) unsalted butter
  • 1/4 cup (53g) white sugar
  • 3/4 cup light brown sugar, lightly packed
  • 1 large egg yolk (discard whites or save for another recipe)
  • 1 teaspoon vanilla
  • 1/3 cup (72g) canned pumpkin (NOT pumpkin pie filling; not an entire can)
  • 1/4 teaspoon fine sea salt
  • 1 teaspoon ground cinnamon
  • 1/4 teaspoon ground ginger
  • 1/8 teaspoon EACH: ground cloves and nutmeg
  • 1/4 teaspoon ground allspice
  • 3/4 teaspoon baking soda
  • 1 and 1/2 cups (190g) white all-purpose flour
  • 2/3 cup (110g) chocolate chips (we like milk chocolate best!)

Instructions

  1. MELT BUTTER: In a large, microwave safe bowl, melt the 1/2 cup butter. Let the butter stand at room temperature until cooled to room temperature. It is very important the butter isn't hot or it will melt the sugars and cause greasy cookies.
  2. ADD SUGARS: Add in 1/4 cup white sugar and 3/4 cup lightly packed light brown sugar to the room temperature melted butter. Stir with a wooden spoon until smooth.
  3. REMAINING WET: Add in the large egg YOLK (discard or save the whites for a different recipe), 1 teaspoon vanilla extract, and 1/3 cup canned pumpkin. Make sure the pumpkin isn't watery; dab off excess moisture IF it is watery. Stir until ingredients are combined.
  4. SPICES: Add 1/4 teaspoon fine sea salt, 1 teaspoon ground cinnamon, 1/4 teaspoon ground ginger, 1/8 teaspoon ground cloves, 1/8 teaspoon ground nutmeg, 1/4 teaspoon ground allspice, and 3/4 teaspoon baking soda. Stir until spices are well incorporated.
  5. FLOUR AND CHOCOLATE: spoon and level (See Note 1) to measure 1 and 1/2 cups flour and add add that to the bowl. Add the 2/3 cup chocolate chips right on top. Gently stir to form a dough. It will seem dry at first, continue to stir until you have a thick and sticky dough. Cover the bowl tightly and refrigerate for one hour.
  6. BAKE: preheat the oven to 350 degrees F. Line a sheet pan with parchment paper or a silpat liner. Measure cookie dough balls that are 1 and 1/2 tablespoons big (or 30 grams). Roll the balls so they are taller rather than wider (see photo in post). Place 6 cookie dough balls on the sheet pan and then place in the freezer for 8 minutes. Remove and bake for 8-11 minutes (we like them best at 9 minutes! Slightly under-baked will yield super soft and chewy cookies) or until no longer glossy on top. Remove from the oven and let cookies stand on sheet pan for 5 minutes. IF desired, press a few more chocolate chips into the tops of the cookies.
  7. STORAGE: using a metal spatula, transfer cookies to a cooling rack and allow the cookies to finish cooling. They firm up more as they cool. Store in an airtight container at room temperature for up to 3 days.


Recipe Notes

  • Note 1: if you press a measuring cup into a bag of flour you will pack way too much flour in; use a spoon to scoop it into a measuring cup and then level the top with the back of a butter knife. If your pumpkin chocolate chip cookies turn out cake-y, there was likely too much flour added. Best case: use a food scale! We want 190 grams of flour.

CHOCOLATE MIRACLE WHIP CAKE

by


Chocolate Miracle Whip Cake - a classic dessert that has been in the family for years! No eggs or oil in the cake batter! SO easy to make - sugar, water, Miracle Whip, vanilla, flour, baking soda, and cocoa powder. Top the cake with a quick homemade cream cheese frosting made with cream cheese, cocoa powder, butter, powdered sugar, heavy cream, and vanilla. This cake is to-die-for delicious! Great for parties, potlucks, and the holidays!


INGREDIENTS:
Cake
  • 1 cup sugar
  • 1 cup Miracle Whip
  • 1 cup water
  • 1 tsp vanilla
  • 2 cups flour
  • 2 tsp baking soda
  • 1/4 cup cocoa powder
Chocolate Cream Cheese Frosting
  • 4-oz cream cheese, softened 
  • 1/4 cup butter, softened 
  • 1 tsp vanilla extract 
  • 1 (16-oz.) package powdered sugar 
  • 1/4 cup unsweetened cocoa 
  • 3 Tbsp heavy cream
INSTRUCTIONS:
  1. Preheat oven to 350ºF. Grease and flour a 9x13-inch cake pan.
  2. Whisk together sugar, Miracle Whip, water, and vanilla. Add flour, baking soda, and cocoa powder.
  3. Pour batter into the prepared cake pan. 
  4. Bake at 350° for 30 to 35 minutes or until a wooden pick inserted in center comes out clean. Cool completely on a wire rack (about 1 hour).
  5. Spread with frosting.
Chocolate Cream Cheese Frosting
  1. Beat together cream cheese, butter, and vanilla at medium speed with an electric mixer until creamy. 
  2. Gradually add powdered sugar and cocoa powder to butter mixture, alternately with heavy cream. 
  3. Beat at low speed until blended. Increase mixer speed to medium, and beat 1 to 2 minutes or until light and fluffy.
  4. Spread frosting on cooled cake.
NOTES:
  • May substitute mayonnaise for Miracle Whip, if desired.
  • May add 1/2 tsp of cinnamon to cake batter, if desired.

PUMPKIN PECAN PIE

by


Pumpkin Pecan Pie - two favorites in one pie! Pumpkin pie on the bottom and pecan pie on top. SO good! Pie crust, pumpkin, eggs, sugar, pumpkin pie spice, corn syrup, butter, vanilla, and chopped pecans. You can make the pie a day or two in advance. Top the pie with whipped cream or vanilla ice cream. A must for your holiday table! #dessert #pie #thanksgiving #pumpkin #pecan #christmas


INGREDIENTS:

  • 1 (9-inch) frozen deep-dish pie shell
  • 1 cup 100% pure pumpkin
  • 1/3 cup granulated sugar
  • 1 large egg
  • 1 tsp pumpkin pie spice
  • 2/3 cup light corn syrup
  • 1/2 cup granulated sugar
  • 2 large eggs
  • 3 Tbsp butter, melted
  • 1/2 teaspoon vanilla extract
  • 1-1/3 cup chopped pecans

INSTRUCTIONS:

  1. Preheat oven to 350° F.
  2. For Pumpkin Layer: Combine pumpkin, sugar, egg and pumpkin pie spice in medium bowl; stir well. Spread over bottom of pie shell.
  3. For Pecan Layer: Combine corn syrup, sugar, eggs, butter, and vanilla extract in a medium bowl; stir in nuts. Spoon over pumpkin layer.
  4. Bake for 50 to 55 minutes or until knife inserted in center comes out clean. Cool completely on wire rack.

NOTES:

  • Make sure to use 100% pure pumpkin and not pumpkin pie filling.
  • Can make pie a day or two in advance.

CHOCOLATE CHIP BUNDT CAKE RECIPE

by
This Chocolate Chip Bundt Cake is seriously the BEST. Homemade buttermilk pound cake loaded with pecans and chocolate chips. Top the cake with some vanilla ice cream and caramel sauce and prepare to be wowed! Pecans, sugar, brown sugar, butter, vanilla, eggs, flour, baking soda, salt, buttermilk, and chocolate chips. Can make in advance and refrigerate or freeze for a sweet treat later! #cake #dessert #poundcake #chocolatechips #bundtcake


INGREDIENTS:

  • 2/3 cup chopped pecans
  • 1/4 cup butter, softened
  • 2 Tbsp sugar
  • 1 cup butter, softened
  • 1 cup firmly packed brown sugar
  • 1/2 cup sugar
  • 1 Tbsp vanilla extract
  • 4 eggs
  • 2-3/4 cups all-purpose flour
  • 1 tsp baking soda
  • 1tsp salt
  • 1 cup buttermilk
  • 1 (12-oz) package semi-sweet mini chocolate chips

INSTRUCTIONS:

  1. Preheat oven to 350ºF. Spray a 12-cup bundt pan with baking spray.
  2. Combine pecans, 1/4 cup butter, and 2 Tbsp sugar. Sprinkle in the bottom of the bundt pan.
  3. In the bowl of an electric stand mixer, beat together 1 cup butter, brown sugar, sugar, and vanilla at medium speed for 3 to 5 minutes, until light and fluffy. Add eggs, one at a time, beating just until blended.
  4. Combine flour, baking soda, and salt. Add flour mixture alternately with buttermilk, beginning and ending with flour mixture. Beat at low speed just until blended after each addition, stopping to scrape bowl as needed.
  5. Stir in chocolate chips and spoon batter into prepared pan.
  6. Bake for 50-55 minutes, or until a long wooden pick inserted in center comes out clean. Cool in pan on a wire rack for 10 minutes. Remove cake from pan to wire rack and cool completely.

Mint-White Chocolate Mousse Cake

by


INGREDIENTS & METHOD


Make the Joconde sheet cake:

  • 1 cup almond flour
  • 3/4 cup confectioners’ sugar, sifted
  • ½ cup all-purpose flour
  • ½ cup dark chocolate cocoa powder (unsweet)
  • 4 eggs
  • 1 egg yolk
  • 4 egg whites
  • 1/4 cup superfine sugar
  • 2 tbsp. melted butter


  1. Preheat the oven to 450°F..
  2. Line an 11.5 x 17-inch jelly roll pan with parchment paper.
  3. Using a stand mixer fitted with the paddle attachment, beat the almond flour, confectioners’ sugar, all-purpose flour, whole eggs, and egg yolk until combined, stopping to scrape down the sides of the bowl as necessary.
  4. In a separate bowl, whip the egg whites with an electric hand mixer. When the egg whites are foamy, gradually add the superfine sugar until a white, shiny meringue forms.
  5. With a large rubber spatula, gently fold the meringue into the almond-flour mixture.
  6. Add the melted butter and gently fold again, being careful not to deflate the batter.
  7. Bake for 5 to 8 minutes or until the cake springs back when pressed in the center. Remove from the oven and let cool slightly.
  8. Invert the cake onto a sheet of parchment and carefully peel away the parchment paper. Trim the edges of the cake with a serrated knife. Set aside.
  9. Have ready a 7” springform pan.  Trim edges and cut one long piece of joconde big enough to fit around the inside of the 7" springform pan.  You may have to piece together with a small portion of cake to line the entire circumference of the pan.
  10. Using the bottom of your pan as a guide, cut a circle of cake from the joconde and press it into the bottom of the pan evenly (you may need to trim the circle slightly for it to fit perfectly). Set joconde-lined pan aside. 


Make the white chocolate mint mousse:

If you're not interested in making this entire cake, this mousse recipe can be made and poured into a parchment-lined loaf pan. If you go this route, be sure to thoroughly chill before turning out onto a serving plate; slice into individual servings.  Creme de menthe can be used to taste in place of the mint extract.


  • 1/4 oz. package of powdered gelatin (about 2 tsp.)
  • 2 tbsp cold water
  • 3 egg yolks
  • 1/2 cup sugar
  • 1/2 cup milk, hot - (put in the microwave for 30+ seconds)
  • 8 oz. high quality white chocolate, chopped (I used Ghirardelli white chips)
  • ½-1 tsp mint extract (add to taste)
  • Few drops of green food coloring
  • 1 1/2 cups whipping cream.


  1.  Place 2 tbsp water in a medium saucepan and sprinkle gelatin over water.  Let stand for 1 minute.  Whisk in egg yolks and sugar; mix well.  Stir in hot milk.  Cook over medium heat, whisking constantly.  Cook until thickened considerably 7-10 minutes. When done, it should be thick enough to coat the back of a spoon.   Stir in melted chocolate and blend with a whisk until chocolate has melted and even in color (no streaks!).  Let cool.
  2. When mixture has cooled somewhat, stir in mint extract and green food coloring.
  3. Whip cream until stiff peaks form.  Gently fold whipped cream into the cooled chocolate-mint mixture until well blended.
Assembly:
  • ½ cup white chocolate
  • 1 chocolate transfer sheet, your choice of pattern
  • 1 cup prepared whipped cream
  • Chocolate cigarettes, curls or shavings
  1. Pour as much of the mousse as possible into the joconde lined pan; smooth the top.  (you will have a little mousse and joconde cake left over.  I suggest making a single-serving trifle).
  2. Place mousse cake into the freezer for 2-3 hours, or until firm.  Remove from freezer and remove cake from springform pan.  Measure side of joconde cake and cut the chocolate transfer sheet to size.  Melt white chocolate chips in the microwave at 30 second intervals until smooth.  Let chocolate cool slightly, then spread onto the chocolate transfer sheet with an offset spatula in one or two even strokes.  Allow chocolate to harden then peel away the acetate, revealing the patterned chocolate.
  3. Pipe whipped cream in a florettes in the middle of the cake (I used Wilton #133 tip).  Decorate with chocolate cigarettes, curls or shavings.
  4. Serve frozen or allow cake to thaw in the refrigerator and serve cold.  Keep uneaten portion wrapped in plastic wrap and store in the refrigerator or freezer.

Salted Caramel Pumpkin Cheesecake

by


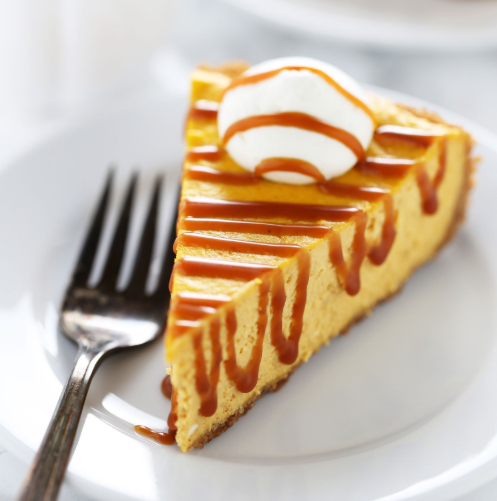
Salted Caramel Pumpkin Cheesecake is the ultimate crowd-pleasing and fun Thanksgiving dessert! SO much more flavorful than pumpkin pie!


Ingredients

For the crust:


  • 15 whole graham crackers (230 grams)
  • 1/2 teaspoon ground cinnamon
  • 6 tablespoons (85 grams) unsalted butter, melted

For the filling:

  • 24 ounces (680 grams) cream cheese, at room temperature
  • 1 1/2 cups (300 grams) granulated sugar
  • 15 ounces (425 grams) pureed pumpkin
  • 1/4 cup (77 grams) salted caramel sauce, homemade or store-bought
  • 1/4 cup (57 grams) sour cream
  • 3 large eggs plus 1 egg yolk
  • 1 teaspoon ground cinnamon
  • 1/2 teaspoon fresh ground nutmeg
  • 1/4 teaspoon ground cloves
  • 2 tablespoons all-purpose flour
  • 1 teaspoon vanilla extract

For the topping:

  • Whipped cream
  • Salted caramel sauce, homemade or store-bought

Directions

  1. Preheat the oven to 325°F. Spray a 9-inch springform pan with nonstick cooking spray.

Make the crust:

  1. In the bowl of a food processor, combine the graham crackers and cinnamon. Pulse until finely ground. You should have 1 3/4 cups (230 grams) graham cracker crumbs. Add the butter and pulse until moistened. Press into the bottom and halfway up the sides of the pan. Bake for 10 minutes. Place on a wire rack to cool. Maintain oven at 325°F.
Make the cheesecake:
  1. In the bowl of a food processor or electric mixer, beat the cream cheese, sugar, pumpkin puree, caramel, and sour cream until smooth. Add the eggs and yolk, cinnamon, nutmeg, cloves, flour, and vanilla and puree until just combined. Pour over crust and spread evenly. Bake for 1 hour, or until set and dry at the edges but slightly jiggly in the center. Turn off the oven and allow to cool inside for 15 minutes before removing to a cooling rack to cool to room temperature (this helps prevent cracks). Refrigerate for at least 6 hours, or overnight. The cheesecake can be refrigerated for up to 3 days. Top with whipped cream and caramel sauce before serving.

Recipe Notes

  • For a fun twist, feel free to use Speculoos or Gingersnap cookies in place of the graham crackers! You'll need 1 3/4 cups (230 grams) of crumbs.

Lemon Cheesecake

by


Lemon Cheesecake is ultra rich, creamy, and tangy and made with a buttery graham cracker crust and topped with tart lemon curd. Learn my secrets for a perfectly smooth cheesecake with zero cracks!


Ingredients
For the crust:


  • 1 3/4 cups (230 gramgraham crackers crumbs (about 15 whole graham crackers)
  • 1 tablespoon granulated sugar
  • 6 tablespoons unsalted butter, melted

For the filling:

  • 32 ounces (907 grams) cream cheese, completely softened to room temperature
  • 1 cup (200 grams) granulated sugar
  • 2/3 cup (173 grams) sour cream, at room temperature
  • 3 tablespoons fresh lemon juice
  • 1 tablespoon finely grated lemon zest
  • 2 tablespoons all-purpose flour
  • 4 large eggs plus 1 egg yolk, at room temperature

For baking and finishing:

  • Boiling water, for the water bath
  • Prepared lemon curd, for serving

Directions

  1. Preheat the oven to 325°F.
  2. Prepare a 9-inch springform pan for a water bath. Place a large square of heavy-duty aluminum foil underneath the pan. Gently fold the edges up and around the pan. Repeat twice so there’s three sheets of foil to ensure a waterproof seal. Gently fold the top of the foil around the edge of the pan. Spray with nonstick cooking spray.

Make the crust:

  1. In a medium bowl, combine the graham cracker crumbs, sugar, and butter until the mixture is moistened. Press firmly into the bottom and quarter way up the sides of the prepared pan. Bake for 10 minutes. Place on a wire rack to cool. Maintain oven temperature.

Make the filling:


  1. In a large bowl, use an electric mixer to beat the cream cheese on medium speed until completely smooth and free of lumps, scraping down the bowl as needed. Add the sugar and beat until combined. Add in the sour cream, lemon juice, lemon zest, and flour. Add the eggs and yolk, one at a time, and beat until just combined. Be careful not to overmix.
  2. Pour the batter into the foiled-wrapped springform pan. Tap the pan against the counter a few times to release any air bubbles in the batter.

Prepare the water bath:

  1. Place the pan in a larger roasting pan. Pour boiling water into the roasting pan until the water is about halfway up the sides of the cheesecake pan.


Bake the cheesecake:

  1. Bake at 325°F for 1 hour to 1 hour 15 minutes, or until the top looks slightly dry. If the middle is slightly wobbly, that’s fine. Err on the side of underbaking rather than overbaking.
  2. Turn off the oven heat and open the oven door open just by 1-inch. Let the cheesecake cool inside the oven for 1 hour. This will prevent cracks from forming.
  3. Remove the cheesecake from the oven and from the water bath, unwrap the foil, and transfer it to a cooling rack. Run a thin-bladed flexible knife around the edge of the cake to make sure it's not sticking to the sides (which can cause cracks as it cools). Let the cheesecake cool completely to room temperature on the rack.
  4. Refrigerate until completely chilled, at least 5 hours or up to 3 days. Store the cheesecake uncovered to avoid creating condensation, which will create a mushy texture.
  5. Release the cheesecake from the pan onto a cake stand or serving plate and top with the lemon curd. Slice using a big sharp knife, wiping it off under running hot water in between cuts. Serve.

Mint Chocolate Cupcakes

by


Mint Chocolate Cupcakes are ultra moist and easy to make with tons of refreshing chocolate peppermint goodness. Perfect for St. Patrick’s Day or Christmas!


Ingredients

For the chocolate cupcakes


  • 4 ounces (113 grams) bittersweet chocolate, finely chopped
  • 1/3 cup (28 grams) Dutch-process cocoa (do not substitute)
  • 1/2 cup boiling water
  • 3/4 cup plus 2 tablespoons (113 grams) all-purpose flour
  • 1/2 cup (100 grams) granulated sugar
  • 1/4 cup (50 grams) packed light brown sugar
  • 1/2 teaspoon salt
  • 1/2 teaspoon baking soda
  • 1/2 cup (113 grams) sour cream or full fat plain yogurt, at room temperature
  • 1/4 cup vegetable oil
  • 2 large eggs plus one egg yolk, at room temperature
  • 2 teaspoons white vinegar
  • 1/2 teaspoon peppermint extract*

For the mint frosting

  • 3 cups (375 grams) powdered sugar, sifted
  • 8 ounces (227 grams) unsalted butter, at room temperature
  • 1/4 teaspoon fine salt
  • 1/4 to 1/2 teaspoon peppermint extract* depending on desired intensity
  • 1 to 2 tablespoons heavy cream
  • Green gel food coloring, if desired
  • 6 Sprinkles, chocolate shavings, or Andes mints, for garnish

Directions

Make the cupcakes:

  1. Preheat the oven to 350°F. Line a standard 12-cup muffin tin with foil or paper liners.

  2. In a medium heatproof bowl add the chocolate and cocoa powder. Pour the boiling water over mixture. Cover and let stand for 5 minutes. Whisk gently until smooth then set aside to cool.
  3. In a small bowl, whisk together the flour, sugars, salt, and baking soda.
  4. Whisk sour cream, oil, eggs, egg yolk, vinegar, and peppermint extract into the cooled chocolate mixture until smooth. Stir in the flour mixture until smooth, being careful not to overmix.
  5. Using a spring-loaded scoop, divide the batter evenly among prepared muffin cups. Bake until cupcakes are set and firm to the touch, about 20 minutes. Let cupcakes cool in pan on a wire rack for 10 minutes before removing from pan to cool completely, about 1 hour.
  6. Cupcakes can be stored in an airtight container at room temperature for up to 1 day.

Make the frosting:

  1. In the bowl of a stand mixer fitted with the paddle attachment, mix together the sugar and butter. Mix on low speed until well blended and then increase the speed to medium and beat for another 3 minutes, or until the mixture is completely smooth. Scrape down the sides and bottom of the bowl as needed. Add the salt, peppermint extract, and cream and beat on medium for 1 minute, or until light and creamy, adding more cream if needed. Add in green gel food coloring, if desired, and beat until evenly colored.
  2. Transfer frosting to a piping bag fitted with a decorative tip and pipe onto each cupcake. Decorate with desired garnish. Serve or store in an airtight container at room temperature for 1 day, or in the fridge for 3 days.


Peanut Butter Cup Ice Cream Sandwiches

by


Homemade Peanut Butter Cup Ice Cream Sandwiches combine ultra chocolaty, creamy, and rich ice cream with chewy peanut butter cookies and crunchy salted peanuts.


Ingredients
For the chocolate ice cream:


  • 1 1/2 cups whole milk
  • 1 1/2 cups heavy cream
  • 3/4 cup sugar, divided
  • 1/4 cup unsweetened cocoa powder, preferably Dutch-process, sifted
  • 1/4 teaspoon salt
  • 1/2 teaspoon vanilla extract
  • 8 ounces (about 2 cups) bittersweet or semisweet chocolate, melted
  • 4 large egg yolks
For the peanut butter cookies:
  • 1 1/2 cups all-purpose flour
  • 1 teaspoon baking soda
  • 1/4 teaspoon baking powder
  • 1/4 teaspoon salt
  • 6 ounces (1 1/2 sticks) unsalted butter, at room temperature
  • 1/2 cup granulated sugar
  • 1/2 cup light brown sugar
  • 3/4 cup creamy peanut butter
  • 1 large egg
  • 1/2 teaspoon vanilla extract
  • Chopped salted peanuts, for rolling

Directions
For the ice cream:

  1. Prepare an ice bath by filling a large bowl with ice cubes and a cup or two of water. Place a medium bowl fitted with a fine strainer inside the ice bath.
  2. In a medium saucepan combine the milk, cream, 1/2 cup of the sugar, cocoa powder, salt, and vanilla. Set over medium heat, stirring occasionally, until the mixture is warm and begins to steam, about 5 minutes. Stir in the melted chocolate.
  3. Whisk together the egg yolks and remaining 1/4 cup of sugar. Carefully whisk half of the warm milk mixture into the egg yolks, one ladleful at a time, until the egg mixture is warmed. Whisk the egg-milk mixture back into the saucepan. Cook the mixture over medium heat, stirring constantly, until the mixture is thick enough to coat the back of the spoon and registers around 175°F on an instant-read thermometer, about 5 to 7 minutes. Be careful not to boil the mixture.
  4. Immediately strain the mixture through the fine strainer into the prepared ice bath. Cool the custard in the ice bath until it’s at room temperature, stirring often. Press plastic wrap against the surface of the custard and refrigerate until chilled, about 4 hours or up to 1 day.
  5. Pour the mixture into an ice cream maker and freeze according to the manufacturer’s directions. Transfer to an airtight container, press plastic wrap against the surface of the ice cream, and freeze until firm and flavor is ripened, at least 2 hours.

For the cookies:

  1. Preheat the oven to 350°F. Line large baking sheets with parchment paper or silicone baking mats.
  2. In a medium bowl, whisk together the flour, baking soda, baking powder, and salt.
  3. In a large bowl, beat the butter, granulated sugar, and brown sugar on medium-high speed until smooth, 1 to 2 minutes. Beat in the peanut butter until fully incorporated. Beat in the egg and then the vanilla. On low speed, gradually add the flour mixture, beating until combined. Dough will be sticky and wet.
  4. Drop 2-tablespoon sized balls of dough on prepared baking sheets, spacing about 2-inches apart. Slightly flatten the dough with wet fingers. Bake for 10 to 12 minutes, rotating halfway through, until the edges are slightly browned. Let cool completely. Freeze the cookies until frozen, at least 1 hour. Cookies can be stored in airtight containers in the freezer for up to 1 month.

To assemble:

  1. Place the peanuts in a shallow dish. Top one cookie with a scoop of ice cream. Place another cookie on top of the ice cream and gently press down to form a sandwich. Roll the edges in the peanuts. Repeat for the remaining cookies. Freeze for at least 1 hour before serving.
  2. Sandwiches can be individually wrapped in plastic and stored in the freezer for up to 1 week. Let stand at room temperature for 5 to 10 minutes before serving.

Chocolate Covered Strawberry Ice Cream Cake

by


Homemade Chocolate Covered Strawberry Ice Cream Cake is delightfully fruity, frosty, and impressive, making it the perfect special cake for summer.


Ingredients

For the chocolate cake:

  • 1 3/4 cups (7.8 ounces or 221 grams) all-purpose flour
  • 2 cups granulated sugar
  • 3/4 cup (3.1 ounces or 89 grams) unsweetened cocoa powder
  • 2 teaspoons baking soda
  • 1 teaspoon Clabber Girl baking powder
  • 1 teaspoon fine salt
  • 3/4 cup sour cream
  • 1/2 cup vegetable oil
  • 3 large eggs, at room temperature
  • 1 teaspoon vanilla
  • 1 cup boiling water

For the strawberry ice cream:

  • 1 quart fresh strawberries, hulled and chopped
  • 4 ounces cream cheese, at room temperature
  • 1/2 cup sour cream
  • 1/2 cup whole milk
  • 1/2 cup heavy cream
  • 1 teaspoon fresh lemon juice
  • 2 tablespoons corn syrup
  • 3/4 cup granulated sugar
  • 1/4 teaspoon fine sea salt
  • 1 1/2 teaspoons vanilla extract
  • For the chocolate ganache:
  • 6 ounces semisweet chocolate, chopped
  • 1/2 cup heavy cream
  • Strawberries, hulled and sliced, for garnish

Directions

For the cake:


  1. Preheat the oven to 350°F. Butter and flour two 8-inch round cake pans.
  2. In the bowl of a stand mixer, sift together the flour, sugar, cocoa, baking soda, and baking powder. Add in the salt. Mix on low speed until combined. In a small bowl combine the sour cream, vegetable oil, eggs, and vanilla. On low speed gradually add the sour cream mixture into the dry ingredients. Beat on low until just combined, scraping down the edges as necessary. Add in the boiling water and beat until just combined. Be careful not to over-mix.
  3. Divide the batter evenly between the prepared pans and bake for 35 to 40 minutes, or until a cake tester comes out clean. Cool the cakes in their pans for 30 minutes before carefully turning them out onto a cooling rack. Freeze the cakes until very firm.

For the ice cream:

  1. In the pitcher of a blender, puree all the ingredients until smooth. Transfer the mixture to a medium bowl and press plastic wrap against the surface. Chill in the refrigerator for at least 30 minutes, or up to 1 day.
  2. Pour the chilled mixture into an ice cream maker and freeze according to the manufacturer’s directions. Line a clean 8-inch cake pan with plastic wrap. Pour the ice cream into the cake pan then press another sheet of plastic wrap against the surface. Freeze until firm, about 2 hours or up to 2 days.

For the ganache:

  1. Place the chocolate chips in a medium heatproof bowl. In a small saucepan heat the cream just until simmering. Pour over the chocolate chips. Let sit for 3 minutes before stirring until the mixture is melted and smooth. Let cool until the ganache is thickened but still pourable.

To assemble:


  1. On a serving plate or cake stand, place 1 cake layer upside-down. Remove the ice cream from the pan and place over the cake, peeling off the plastic wrap. Top with the remaining cake layer. Pour the ganache over the cake, letting it drip down the sides. Freeze for 2 hours, or until firm. Top with strawberries and let stand for 5 to 10 minutes before slicing and serving.